
Information On The Best Selling Tropf Blumat Drip Irrigation System
Efficient And Effective In Use
This drip irrigation watering system from Tropf Blumat offers controlled, automatic, versatile drip watering for plants in gardens, greenhouses, planters, raised beds or grow bags by a cleverly designed, ‘intelligent’ means which uses water efficiently and effectively, delivering only enough moisture to meet plants’ demands and not wasting an increasingly precious resource.

By only providing your plants with water when they need it this drip irrigation system ensures your plants are never over or under watered, taking care of daily watering for you whether you are at home, work or on holiday. As a result of this consistent, correct amount of water that the drip irrigation system provides to your plants, they should produce more flowers and bigger, better crops.
In addition to the Tropf Blumat drip irrigation system being extremely good at providing your plants with the correct amount of water when they need it, because the water is released slowly and in doses, your plants receive tempered water and healthy, lush growth results.
It is also a simple drip irrigation system to set up. No special tools are required during assembly – just a pair of scissors to cut the tubes to length – there is no timer to install so no complex programming or checking and changing of batteries.
How This Drip Irrigation System Works
The key to Tropf Blumat’s drip irrigation system success is its unique ability to continuously monitor the individual moisture-level around each probe. In order to achieve this, so at the heart of the drip irrigation system, is a ceramic / clay probe, and it is this simple device which does the 'thinking' for you, to ensure your plants remain correctly watered.
|
Ceramic Probe The Ceramic Probe acts as a sensor by registering the moisture in the soil it has been plunged into and then controls the flow of water depending on whether the soil is dry or wet. This ceramic probe is made up of two main sections, a ceramic cone approx. 3inch in length and a top plastic section approx. 2¾inch long. |
 |
The ceramic / clay part of the probe is what comes into direct contact with the soil and measures the moisture of the soil at the vital place - where the roots of your plants are.
When the soil or compost dries out, the ceramic probe tries to pull water through the porous wall of the probe, thereby creating a partial vacuum. This pulls down a diaphragm at the top of the probe, allowing water to flow through the thin rubber drip tubing which is threaded through the head of the probe. As the soil becomes moist the vacuum reduces and the diaphragm closes, shutting off the water supply.

Traditionally you would place one probe for each plant, then each probe would provide the exact amount of water for that one plant , with the water spreading in an area of approx. 10 inch in diameter.
However, it is possible, by adding in-line and end-line drippers, that this 10 inch diameter can be increased. This could be done because your plant is large, but is also a good way to keep budget down when you have a number of plants of the same type in the same area - so one probe would control the watering for a number of plants.
Preparing The Probes For This Drip Irrigation System
To ensure that this irrigation system works successfully you need to prepare the probes. This is a straight forward process, which involves just three key stages:
Stage 1 - fill a bowl with tap water. Unscrew the dark green head from the top of the probe and place the lower part of the probe - with the ceramic cone attached - into the bowl of water. Leave to soak for 15 minutes.

Stage 2 - whilst the lower part of the probe is still in the bowl of water screw the green top back into position, tightening firmly to the top of the base and ensuring that the probe is full of water.
Stage 3 - leave the probes to soak in the bowl of water for at least a further 15 minutes, ready to be used as you set up your irrigation system around your garden, your greenhouse, in your raised beds , hanging baskets etc. etc.
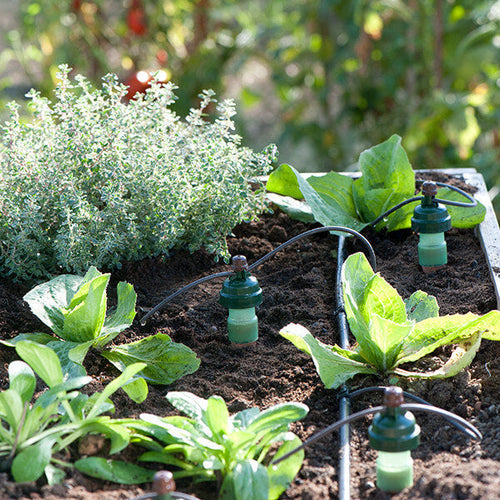
In the photograph below you can see one of the Tropf Blumat probes controlling the water flow.
|
|
Drip tube is fixed through the head of the probe and held in place by screwing down the brown setting knob at the top of the probe. In the example shown, the soil must be dry below the surface, which is why the diaphragm is pulled downwards allowing water to drip from the end of the tube.
|

Preparing The Area The Drip Irrigation System Will Water
Whilst the Tropf blumat probes are prepared, and prior to inserting them into the area to be watered by the irrigation system, you need to make sure that the soil / compost in your hanging basket, container, raised bed, growing bed or where your plants will be growing is thoroughly wet before setting up the irrigation system.
Once the area is wet, you can then position the probes - normally positioning one probe near any plant to be watered - remembering that each probe can cover an area of approx. 10 inch in diameter. To do this, simply push the probe into the soil so that all of the ceramic section in is contact with the soil - ideally pushed into the ground up to half the height of the pale green plastic top section.
Once the probes are in position you need to connect them to your water supply, so where is your water being supplied from?
The Water Supply For Your Tropf Blumat System
Water can be supplied either from your mains water (directly from a screw threaded tap or via a hosepipe) using a pressure reducer, or from a static / stored supply such as an overhead tank or water butt (using a tank connector) with a minimum 3ft head of water. And as there are no electrical connections, electronics or control devices, the Tropf Blumat system is very versatile. In fact, when running from your mains water up to 250 probes in each direction can be operated and even plants up to 12ft above the water supply can be watered successfully.
Mains Water
When connecting the drip irrigation system to your mains water you need to use a Pressure Reducer as this is designed to regulate and reduce the water pressure - the tropf blumat system operates effectively at a maximum water pressure of 1 bar (down to a minimum of 0.5 bar). Depending on where your outside tap is on your house will affect whether you screw the Pressure Reducer directly on to the tap or run some hosepipe from the tap to where you want your watering system to start. Also, if you wish to split the supply of water from your outside tap so you can use it to not only supply water to your irrigation system, but also allow you to fill a watering can etc. then you might use an adaptor on your outside tap first to give more than one outlet for water - the pressure reducer simply screws onto one of the outlets on the adaptor.
|
Pressure Reducer The wide end of the pressure reducer is threaded, enabling it to be screwed securely and drip free onto a ¾inch / 19mm threaded tap. The opposite end of the pressure reducer is where the feed tube for the system is securely connected. |
 |
Static / Stored Water
The Tropf Blumat drip irrigation system works just as well when supplied with water from an elevated tank to which you connect the system using a simple Tank Connector.
|
|
Tank Connector This simple connector creates a watertight seal in your tank and provides a connection point for you to attach the ¼inch feed tube to carry the water around your garden etc. You will need to drill a hole in your tank and be able to access the inside of the tank to fit this. |

The shape of the tank is not important - what is important when it comes to the tank which you are using is that it is positioned higher than the plants which are going to be watered.
|
The larger your irrigation system and the longer the feed tube carrying the water to the probes, then the higher the tank should be placed. The general rule of thumb is that the tank should be approx. 20 inches higher than the plants for every 16ft of feed tube. So for an 32ft length of tube you would need your tank to be at least 40 inches higher than your plants. |
|

Top Tip
When your Tropf Blumat system is run from your mains water it's easy to turn off the tap to stop the supply of water if you need to make any changes. This isn't the case when the water is being supplied from a static tank. In this instance it is a good idea to insert a ¼inch tap into the feed tube a short distance from the Tank Connector. This will then allow you to easily interrupt the supply of water without having to drain the tank or disconnect the tube.
Connecting The Water Supply To The Tropf Blumat Probes
From either your Pressure Reducer or Tank Connector, to carry the water around to your plants, you use ¼inch feed tube - sometimes referred to as supply hose.

Being the main artery of the system, it is important when laying out the tube that there are no kinks which could affect the flow of water. To help prevent this we recommend that, prior to laying out the tube, you warm it by either laying it out in the sunshine or putting it in a bucket of warm water. This should help to release the natural curl to the tube formed from it being held as a roll since it was manufactured.
You can also help to prevent kinks by using the ¼inch connectors when you need to take the tube around a sharp bend / corner and when branching off in different directions.
|
¼inch Feed Tube From one supply of mains water you can operate a system of up to 60 metres with as many as 250 probes inserted. If you fit a ¼inch T Connector immediately after the pressure reducer, you can then run up to two lengths of 60 metres, with up to 250 probes on each length. |
 |
It is not possible to connect this ¼inch feed tube directly to the probes - to take the water from the feed tube to the probe you need some 1/16inch drip tube.
|
|
1/16inch Drip Tube This brown drip tube is a very flexible, silicone tube that fits through the top of the probe and is squeezed and released by the valve within the probe to allow water to flow when the surrounding soil is dry. It is joined to the feed tube using in-line or end-line connectors. |

As you can see in the drawings below, drawing A shows an 'in-line' connector, where two outlets accept the larger feed tube and one outlet accepts the smaller drip tube. Whilst drawing B shows an 'end-line' connector, where one outlet takes the feed tube and one outlet the drip tube.
 Both the feed and drip tube are easy to cut using a pair of sharp scissors, whilst the connectors are designed as barked fittings where you can firmly push the tube on to create a secure, watertight join (do not use any lubricants - grease, soap etc - when pushing the tube on to the connectors).